Requirements
To install OpenStack is necessary that each node have a Linux operating system Red Hat Enterprise Linux 7 or CentOS 7.
All OpenStack Controller Nodes must have at least 4 GB of RAM Memory
Before any operation, in every node, upgrading packages that already exist with the command :
# yum update -y
Architecture
Before starting with the installation process you need to know from the outset the type of architecture that you want to use for OpenStack.
This project allows you to install OpenStack in HA mode, which means that you can have multiple nodes that have the same functionality within the infrastructure. Obviously you have to have at least one node for each function.
In this guide we will use the following structure :
- 1 Puppet Master Node
- 1 Galera Master Node
- 2 Galera Slave Nodes
- 3 HA Proxy Nodes
- 3 Rabbit-MQ Nodes
- 3 OpenStack Controller Nodes
- 3 OpenStack Compute Nodes
- 1 OpenStack Neutron Node
- 1 Storage Node for OpenStack VM images

Puppet Master
The Puppet Master is the node that will be tasked to orchestrate the installation of all other nodes of its features automatically.
First you need to install git on the node :
# yum install git
After that you must clone the project directly in the root's home directory:
# cd /root/
# git clone https://github.com/Eleirbag89/prisma.git
Now modify the file /root/prisma/data/common.yaml customizing the following values:
-
DNS
This is the DNS of Local Network, example:dns : "chainreds-lan"
-
Puppet Master IP
This is the IP of Puppet Master node:ip_puppet_m : "10.0.0.1"
-
Galera nodes IPs
This is a list of all IP addresses of Galera nodes:galera_ips : ["10.0.0.2", "10.0.0.3", "10.0.0.4"]
-
Galera nodes Hostnames
This is a list of all Hostnames of Galera nodes:galera_hosts : ["galera-master", "galera-1", "galera-2"]
-
Galera nodes Wildcard
This is the IP classes for Galera Nodes:wildcard : "10.0.0.%"
-
Database Password
This is the database password of Galera Cluster:db_root_password : "password"
-
HA Proxy nodes IPs
This is a list of all IP addresses of HA Proxy nodes:haproxy_ips : ["10.0.0.5", "10.0.0.6", "10.0.0.7"]
-
HA Proxy nodes Hostnames
This is a list of all Hostnames of HA Proxy nodes:haproxy_hosts : ["haproxy-1", "haproxy-2", "haproxy-3"]
-
HA Proxy nodes Priorities
This is a list of all priorities for loadbalance of HA Proxy nodes:haproxy_priority : ["100", "101", "102"]
-
Virtual Public IP
This is a virtual IP address that will be used at the administrative level between the nodes and HA Proxy to connect to the Database:ip_hap_v : "192.168.7.100"
-
Virtual Internal IP
This is a virtual IP address that will be used to communicate between the nodes of OpenStack:ip_hap_v_private : "10.0.0.100"
-
Network Interface for the Virtual Public IP
The name of interface can comunicate with the Virtual Public IP:vip_interface : "eth0"
-
Network Interface for the Virtual Internal IP
The name of interface can comunicate with the Virtual Internal IP:vip_interface : "eth1"
-
Database Password for OpenStack Users
The password of the database that will use of OpenStack services:openstack_db_pwd : "OpenStack"
-
RabbitMQ nodes IPs
This is a list of all IP addresses of RabbitMQ nodes:rabbit_ips : ["10.0.0.8", "10.0.0.9", "10.0.0.10"]
-
RabbitMQ nodes Hostnames
This is a list of all hostnames of RabbitMQ nodes:rabbit_hosts : ["rabbit-1", "rabbit-2", "rabbit-3"]
-
RabbitMQ Openstack User
This is the username of RabbitMQ for comunicate with Openstack:rab_def_usr : "openstack"
-
RabbitMQ Openstack Password
This is the password of RabbitMQ for comunicate with Openstack:rab_def_pwd : "password"
At this point we would be able to install our Galera Cluster . Now proceed to set OpenStack .
Now modify the file /root/prisma/data/openstack.yaml customizing the following values:
-
Admin Token
This is the Admin Token for execute OpenStack commands:admin_token : "pippo"
We recommend generate their tokens through open-ssl:openssl rand -hex 10 -
OpenStack Controller nodes IPs
This is a list of all IP addresses of OpenStack Controller nodes:controller_ips : ["10.0.0.11", "10.0.0.12", "10.0.0.13"]
-
OpenStack Controller nodes Hostnames
This is a list of all hostnames of OpenStack Controller nodes:controller_hosts : ["controller-1", "controller-2", "controller-3"]
-
OpenStack Nova User Password
This is the OpenStack Nova user Password for services:nova_pass : "novapass"
-
OpenStack Management Network Interface
This is the name of Network Interface for OpenStack services:management_inteface : "eth1"
-
OpenStack External Network Interface
This is the name of Network Interface for OpenStack Neutron:management_inteface : "eth2"
-
OpenStack Compute nodes IPs
This is a list of all IP addresses of OpenStack Compute nodes:compute_ips : ["10.0.0.14","10.0.0.15","10.0.0.16"]
-
OpenStack Compute nodes Hostnames
This is a list of all hostnames of OpenStack Compute nodes:compute_hosts : ["compute-1","compute-2","compute-3"]
-
OpenStack Glance User Password
This is the OpenStack Glance user Password for services:glance_pass : "glancepass"
-
Remote IP of Storage Node for Glance Images
This is the IP of Storage Node for Glance Images:ip_storage_images : "192.168.7.20"
This node use the NFS File System. -
Remote Folder for Glance Images
This is the remote Folder for Glance Images (without final slash):remote_image_dir : "/var/imageshare"
-
Local Point Folder for Glance Images
This is the local folder where point to the Remote Folder Glance Images (without final slash):glance_image_dir : "/var/imageshare"
-
OpenStack Neutron user Password
This is the OpenStack Neutron user Password for services:neutron_pass : "neutronpass"
-
OpenStack Neutron node IP
This is the IP address of OpenStack Neutron node:neutron_ips : ["10.0.0.17"]
-
OpenStack Neutron node Hostname
This is the hostname of OpenStack Neutron node:neutron_hosts : ["neutron-1"]
At this point we have completed the general configuration of our structure . Before proceeding make sure that the hostname of the Puppet Master is puppet :
# sysctl kernel.hostname=puppet
After you've completed the previous stages, run this script in order to install the dependencies, copy files to their working directories and install a production-ready web server (Apache Passenger) that will run as Puppet Master:
# sh /root/prisma/scripts/centos_install.sh
At the end of the installation process we proceed with the installation of various Puppet Agent
Puppet Agents
Once configured the Puppet Master, this will be used to auto configure all nodes related to our structure.
It's necessary that each node is present Puppet Agent Configuration File and run as root :
# sudo -i
# wget https://raw.githubusercontent.com/Eleirbag89/prisma/gh-pages/scripts/agent_init.sh
Galera Nodes
A Galera node is a database MariaDB Galera. With them you can create a cluster in order to always have a high availability of data.
In a Galera Cluster we can always identify a Master node and many nodes Slave
First we need to install the Master Galera using the uppet Agent Configuration File:
# sudo -i
# sh agent_init.sh
During the installation will be required of the information that shall match those included previously in common.yaml:
-----Inizializzazione nodo di Puppet Agent-----
Inserisci l'indirizzo IP del Puppet Master:10.0.0.1
Inserisci l'Hostname del Puppet Master [default puppet]:
Inserisci l'FQDN del Puppet Master:chainreds-lan
Inserisci l'indirizzo IP di questo Nodo:10.0.0.2
Inserisci l'Hostname di questo Nodo:galera-master
Inserisci l'FQDN di questo Nodo [default chainreds-lan] :
Inserisci il nome dell'interfaccia di rete [default eth1]:
At the end of the installation it will be able to install other Galera nodes in exactly the same way.
# crontab -e and remove @reboot /bin/bash /root/recover_cluster.sh N line in every Galera node.
HA Proxy Nodes
HAProxy is a free, very fast and reliable solution offering high availability, load balancing, and proxying for TCP and HTTP-based applications. It also allows you to assign Virtual IPs for cluster nodes.
Then we proceed to the installation on every HA Proxy node:
# sudo -i
# sh agent_init.sh
During the installation will be required of the information that shall match those included previously in common.yaml:
-----Inizializzazione nodo di Puppet Agent-----
Inserisci l'indirizzo IP del Puppet Master:10.0.0.1
Inserisci l'Hostname del Puppet Master [default puppet]:
Inserisci l'FQDN del Puppet Master:chainreds-lan
Inserisci l'indirizzo IP di questo Nodo:10.0.0.5
Inserisci l'Hostname di questo Nodo:haproxy-1
Inserisci l'FQDN di questo Nodo [default chainreds-lan] :
Inserisci il nome dell'interfaccia di rete [default eth1]:
After installation of each HAProxy node we can verify proper operation of the Galera and HA Proxy nodes.
To do this simply open a web browser and go to http://192.168.7.100:8080 and see the Galera Cluster table. If all nodes are green means that all is well:
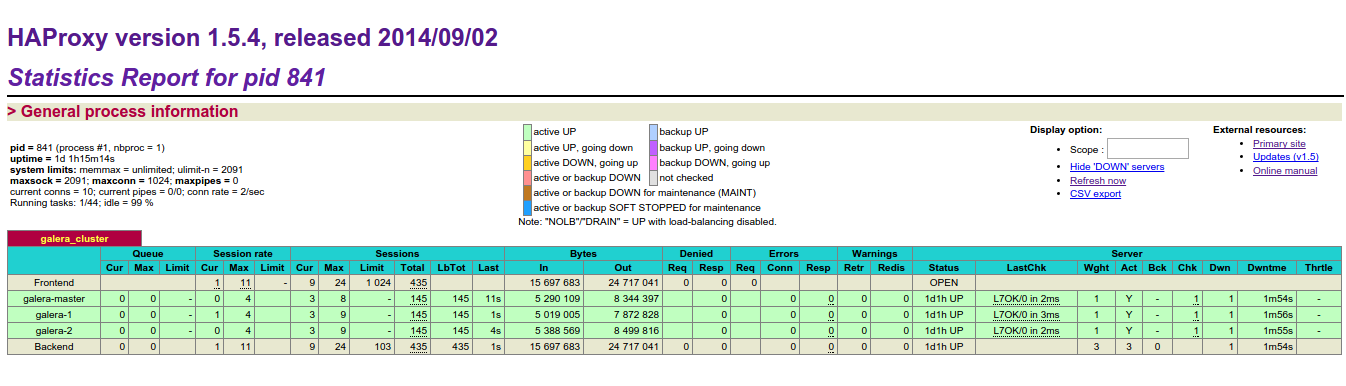
Username:
haproxyPassword:
password
RabbitMQ Nodes
RabbitMQ is open source message broker software (sometimes called message-oriented middleware) that implements the Advanced Message Queuing Protocol (AMQP).
Then we proceed to the installation on every RabbitMQ node:
# sudo -i
# sh agent_init.sh
During the installation will be required of the information that shall match those included previously in common.yaml:
-----Inizializzazione nodo di Puppet Agent-----
Inserisci l'indirizzo IP del Puppet Master:10.0.0.1
Inserisci l'Hostname del Puppet Master [default puppet]:
Inserisci l'FQDN del Puppet Master:chainreds-lan
Inserisci l'indirizzo IP di questo Nodo:10.0.0.8
Inserisci l'Hostname di questo Nodo:rabbit-1
Inserisci l'FQDN di questo Nodo [default chainreds-lan] :
Inserisci il nome dell'interfaccia di rete [default eth1]:
After installation of each RabbitMQ node we can verify the status of your cluster with command:
# rabbitmqctl cluster_status
Openstack Controller Nodes
The node controller OpenStack provides user management and is responsible for orchestrating the work of its nodes as OpenStack compute and others.
Then we proceed to the installation on every OpenStack Controller node:
# sudo -i
# sh agent_init.sh
During the installation will be required of the information that shall match those included previously in common.yaml:
-----Inizializzazione nodo di Puppet Agent-----
Inserisci l'indirizzo IP del Puppet Master:10.0.0.1
Inserisci l'Hostname del Puppet Master [default puppet]:
Inserisci l'FQDN del Puppet Master:chainreds-lan
Inserisci l'indirizzo IP di questo Nodo:10.0.0.11
Inserisci l'Hostname di questo Nodo:controller-1
Inserisci l'FQDN di questo Nodo [default chainreds-lan] :
Inserisci il nome dell'interfaccia di rete [default eth1]:
Openstack Compute Nodes
Use OpenStack Compute to host and manage cloud computing systems. OpenStack Compute is a major part of an Infrastructure-as-a-Service (IaaS) system. The main modules are implemented in Python.
Then we proceed to the installation on every OpenStack Compute node:
# sudo -i
# sh agent_init.sh
During the installation will be required of the information that shall match those included previously in common.yaml:
-----Inizializzazione nodo di Puppet Agent-----
Inserisci l'indirizzo IP del Puppet Master:10.0.0.1
Inserisci l'Hostname del Puppet Master [default puppet]:
Inserisci l'FQDN del Puppet Master:chainreds-lan
Inserisci l'indirizzo IP di questo Nodo:10.0.0.14
Inserisci l'Hostname di questo Nodo:compute-1
Inserisci l'FQDN di questo Nodo [default chainreds-lan] :
Inserisci il nome dell'interfaccia di rete [default eth1]:
Openstack Neutron Node
Neutron is an OpenStack project to provide "networking as a service" between interface devices (e.g., vNICs) managed by other Openstack services (e.g., nova).
Then we proceed to the installation on OpenStack Neutron node:
# sudo -i
# sh agent_init.sh
During the installation will be required of the information that shall match those included previously in common.yaml:
-----Inizializzazione nodo di Puppet Agent-----
Inserisci l'indirizzo IP del Puppet Master:10.0.0.1
Inserisci l'Hostname del Puppet Master [default puppet]:
Inserisci l'FQDN del Puppet Master:chainreds-lan
Inserisci l'indirizzo IP di questo Nodo:10.0.0.17
Inserisci l'Hostname di questo Nodo:neutron-1
Inserisci l'FQDN di questo Nodo [default chainreds-lan] :
Inserisci il nome dell'interfaccia di rete [default eth1]:
Manual Setup
If you had problems with Puppet Agent Configuration File follow these instructions to install a node of your architecture
Change the /etc/hosts and add the following lines
10.0.0.1 puppet.fqdn puppet
10.0.0.2 puppet-agent.fqdn puppet-agent
During the installation will be required of the information that shall match those included previously in common.yaml
The second line regards the particular (local) node you want to configure through the Puppet Master. Since you have already configured the Puppet Master, I assume Puppet Master hostnames are set up, thus Puppet Master knows everything about your nodes.
Install Puppet on puppet agent nodes with commands:
# rpm -ivh https://yum.puppetlabs.com/puppetlabs-release-el-7.noarch.rpm
# sudo yum install puppet
Run this command in order to request a certificate from the Puppet Master and let it apply the proper configuration:
# puppet config set ordering manifest;
# puppet agent -t --server puppet.fqdn --environment test --certname puppet-agent.fqdn
Verify Operations
To verify that all operations are successfully concluded and that the services are active simply view the dashboard of HA Proxy
To do this simply open a web browser and go to http://192.168.7.100:8080 and see the Galera Cluster table. If all nodes are green means that all is well.
Username:
haproxyPassword:
password
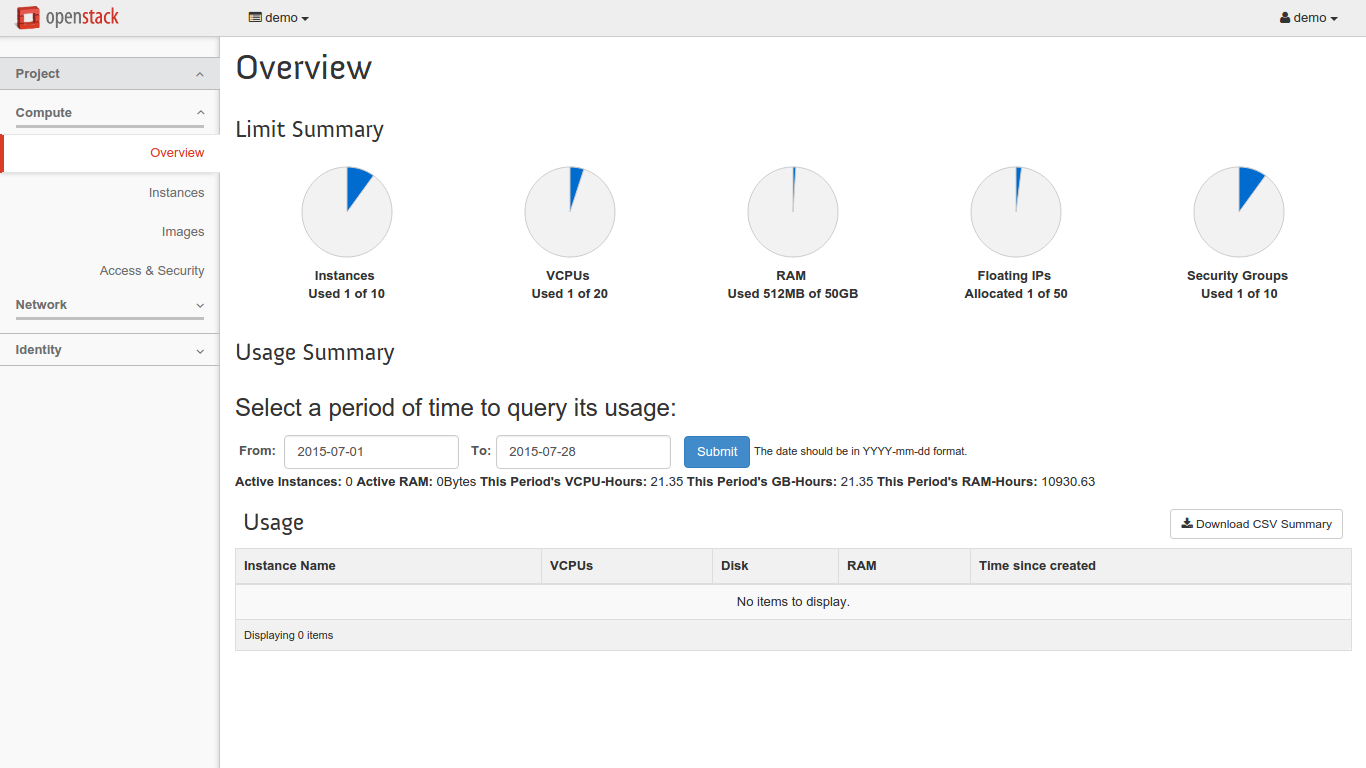
You can also log on to the Horizon Dashboard by going to http://192.168.7.100/dashboard/ and login with demo or admin account.
Add more Nodes
To add a new node, you must first edit the file /etc/puppet/data/common.yaml and /etc/puppet/data/openstack.yaml in Puppet Master.
If the node that you want to add requires use HAProxy you must also upgrade those nodes .
Add Galera Node
After changing adequately file /etc/puppet/data/common.yaml in Puppet Master adding IP and hostname of the new node, you can install the Service with the classic mode:
# sudo -i
# wget https://raw.githubusercontent.com/Eleirbag89/prisma/prisma2/scripts/agent_init.sh
# sh agent_init.sh
After you will have to update the information in the other nodes related to the new one. To do this, in each HAProxy and Galera node execute the following command:
# puppet agent
Add HAProxy Node
After changing adequately file /etc/puppet/data/common.yaml in Puppet Master adding IP, hostname and priority of the new node, you can install the Service with the classic mode:
# sudo -i
# wget https://raw.githubusercontent.com/Eleirbag89/prisma/prisma2/scripts/agent_init.sh
# sh agent_init.sh
After you will have to update the information in the other nodes related to the new one. To do this, in each HAProxy node execute the following command:
# puppet agent
Add RabbitMQ Node
After changing adequately file /etc/puppet/data/common.yaml in Puppet Master adding IP and hostname of the new node, you can install the Service with the classic mode:
# sudo -i
# wget https://raw.githubusercontent.com/Eleirbag89/prisma/prisma2/scripts/agent_init.sh
# sh agent_init.sh
After you will have to update the information in the other nodes related to the new one. To do this, in each HAProxy node execute the following command:
# killall -u rabbitmq
# puppet agent
Add OpenStack Controller Node
After changing adequately file /etc/puppet/data/openstack.yaml in Puppet Master adding IP and hostname of the new node, you can install the Service with the classic mode:
# sudo -i
# wget https://raw.githubusercontent.com/Eleirbag89/prisma/prisma2/scripts/agent_init.sh
# sh agent_init.sh
After you will have to update the information in the other nodes related to the new one. To do this, in each HAProxy node execute the following command:
# puppet agent
Add OpenStack Compute Node
After changing adequately file /etc/puppet/data/openstack.yaml in Puppet Master adding IP and hostname of the new node, you can install the Service with the classic mode:
# sudo -i
# wget https://raw.githubusercontent.com/Eleirbag89/prisma/prisma2/scripts/agent_init.sh
# sh agent_init.sh
Work in Progress
We are completing work to allow you to add in HA Proxy also Neutron.